
| a e [L Y N N] ( @ 2007-06-25 15:48:00 |
|
|
|||
|
|
|
|
|
|
|
| Current mood: | |
| Current music: | Dane Cook; The Nothing Fight |
| Entry tags: | !tutorial |
Manga Coloring Tutorial
There are a lot of Manga coloring tutorials out there; a lot of them have the same directions, so forgive me if this really supports the expression, "A dime in a dozen". ^^'
Tested With: Adobe Photoshop 7.0; Macromedia Fireworks MX
Level: Users are assumed to know basic uses of graphic programs (eraser tool, brush tool, blending modes, etc.)
Work: Here
 |
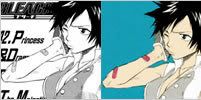
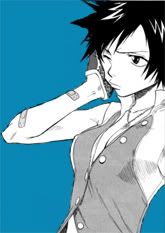
 »» »»  STEP ONE: First start out with your manga base; mine is Tatsuki Arisawa (cropped and resized), and was found at Bleach7. Next, erase any unwanted writing/marks/whatever in your manga base using the eraser tool. Simple enough. |
 »» »» 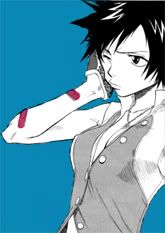 STEP TWO: IN A SEPERATE TOP LAYER, begin coloring the background with the Brush Tool; my background color happens to be #0987B4. Once the background is filled, set Blending Mode to Multiply at 100% Opacity. (?) NOTE: If you color onto any black areas of the manga base, don't worry! It won't show in the final image! :O STEP THREE: IN A SEPERATE TOP LAYER, we'll begin coloring her Band-Aids. Using the Brush tool, simply color them in and set Blending Mode to Multiply at 100% Opacity. (?) I happened to use #E13F77. |
 »» »» 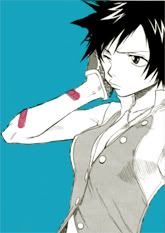 STEP FOUR: IN A SEPERATE TOP LAYER, fill in the entire new layer with the color #F0EEB5 and set Blending Mode to Soft Light at 66% Opacity. This is just to give the shirt a bit of light color, and to make that new shade of blue in the background. :D NOTE: Macromedia Fireworks users! Instead of Soft Light, set Blending Mode to Screen at 25% Opacity!!!!!! |
 »» »»  STEP FIVE: IN A SEPERATE TOP LAYER, we'll now start coloring in her skin! Using your handy dandy brush tool, fill in the skin space with #F8E9CC and set Blending Mode to Multiply at 75% Opacity. Make sure not to fill in her eyes! STEP SIX: Wanna make the skin darker? Easy! Duplicate the skin layer by Right Clicking on it » Duplicate Layer. Set the duplicated layer's Blending Mode to Soft Light at 43% Opacity. |
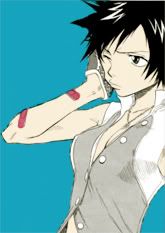
 »» »» 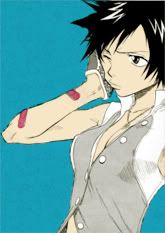 STEP SEVEN: We'll now add a pattern to the background! IN A SEPERATE TOP LAYER, just copy and paste the pattern provided above, found at Hybrid Genesis, and modified by me. Set Blending Mode to Multiply at 60% Opacity (or whichever fits your manga base). Erase anywhere the pattern collides with Tatsuki's skin. NOTE: Any good ol' monochrome pattern will work! |
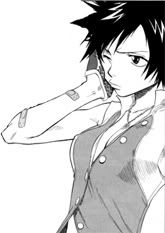
| Your manga sheet is finished, and ready to be made into icons, wallpaper, etc! :O I'd rather you not use this finished product for anything besides you learning how to do this tutorial. It's been used enough already, LOL. However, there will be no credit needed for this tutorial. Heaven knows how many manga coloring tutorials are out there! Feedback is appreciated. Did you understand it, or did this tutorial not make any sense at all? Also, seeing your own work would be awesome! ^_^ |